
Managing users
The Users page in ChartHop is where you can add, update, and remove users from your account. You can find it by selecting Access > Users
Users are people who have access to login to ChartHop with a set access role.
The Users page lists the:
- User - The persons name as set in the user settings
- Email - current primary email for their ChartHop login
- Status - Preboarding or Active
- Preboarding users will have unique login structures and will automatically be shifted to Active on their start date.
- Invitation - Invited - Join
- Invited - has been sent an email to login to ChartHop but has not yet logged in.
- Joined - has logged in and their last active time can be seen in the table.
- External to Org - if they are not in a job within the organization
- Filter limited - Special rules applied to their access role
- Last active - When did they last login to ChartHop
Adding Users
Adding Org Members as Users
If you would like to add users, you can do so by going through the inviting users flows: the Manual invitation flow or the Automatic invitation flow.
Adding External Users
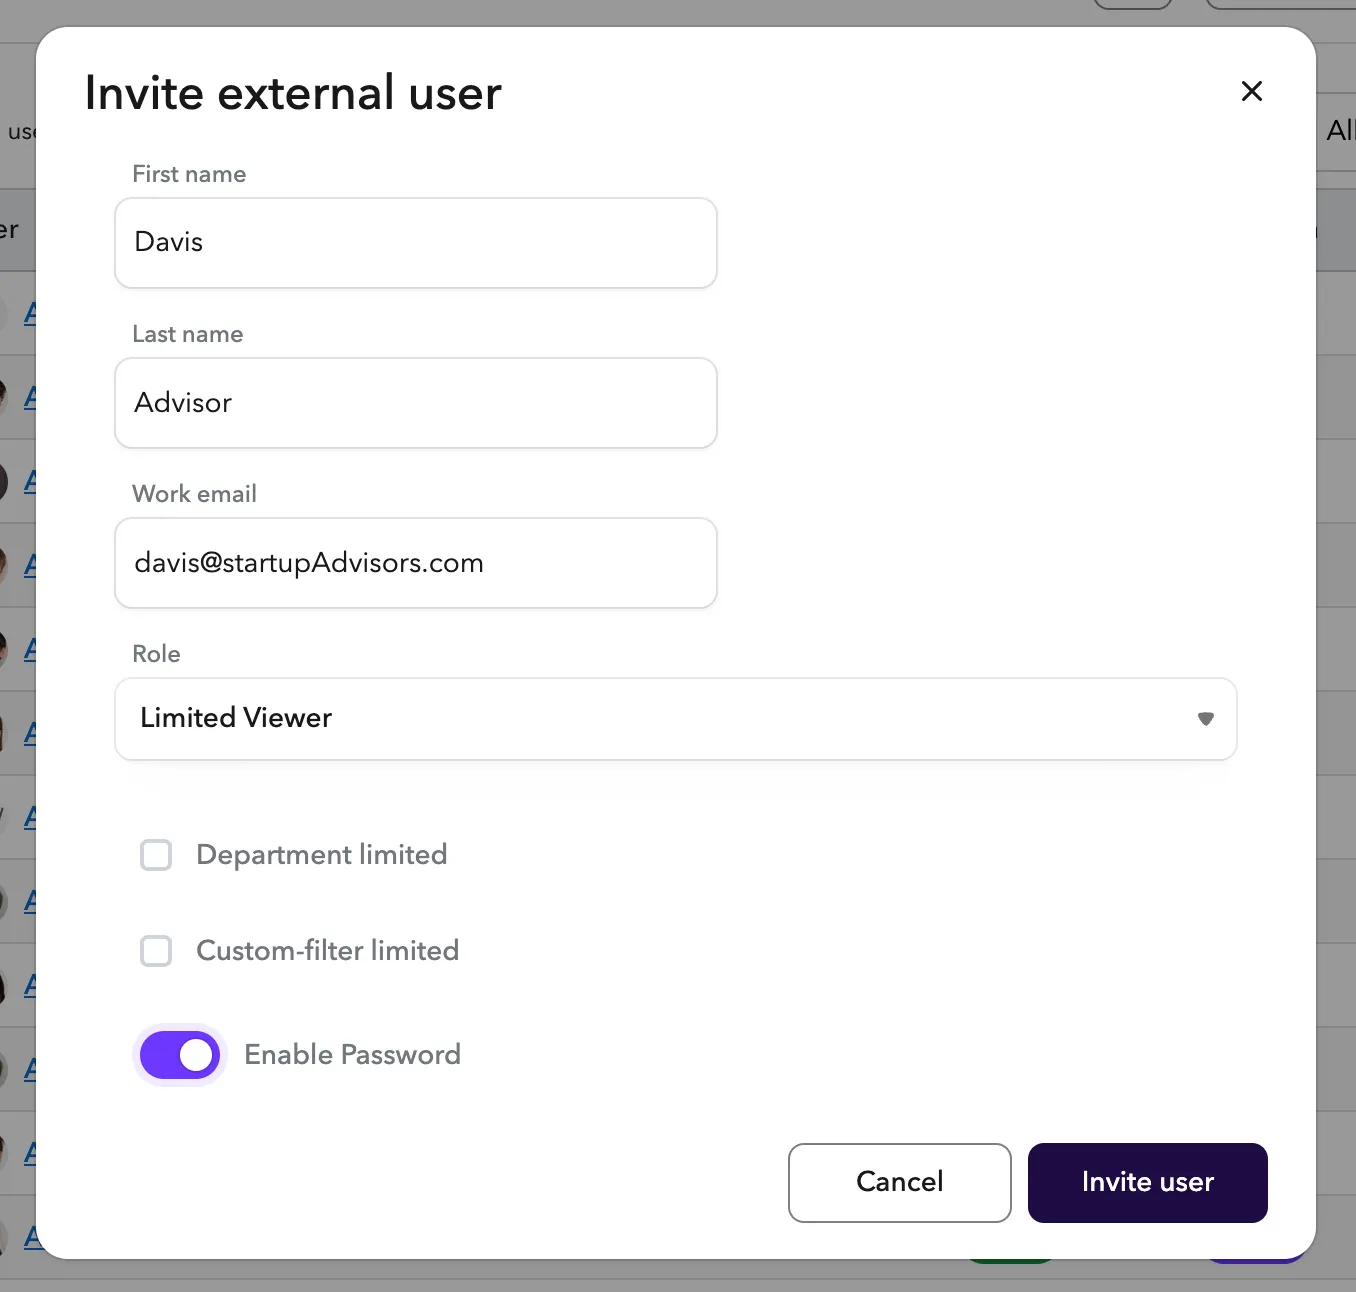
External users are people who are not "in a job" at your organization, but still may need access to your account or data. These might be people like Advisors, Board Members, HR/People Consultants, or Technical Consultants
To invite external users:
- Navigate to the Users page
- Clicking the Invite external users button in the top right corner.
- Add in their First name, Last name, Email, and Role.
- You will often want to select "Enable Password" for an external if they are not a part of your company SSO.
- Click Invite user to invite the external user
Resending ivitations
Users who have been invited to join your org, but have not yet logged in will be listed as Invited.
To resend an invitation to these users:
- From the left sidebar, select Access.
- From the sub-menu, select Users if not already preselected.
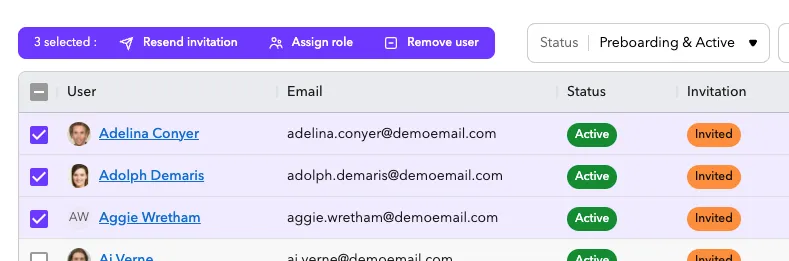
- From the Users list, select the checkbox users you would like to resend invitations to.
- Click Resend invitation and the emails will automatically be sent.
Assigning Roles
Roles are primarity assigned either during the Manual invitation flow or by the Automatic invitation flow. Below on detail of how to update or edit a users role.
For roles with access to sensitive data, you can further customize the role by adding a filter that allows that person to see sensitive data for particular departments or by a custom filter that you can define.
Assign a role to an individual user
To edit a user's current roles:
- From the left sidebar, select Access.
- From the sub-menu, select Users if not already preselected.
- From the Users list, select the person's name whose role you want to edit.
- Select their role from the dropdown in the Edit user dialog.
Assign roles to users in bulk
To edit a user's current roles:
- From the left sidebar, select Access.
- From the sub-menu, select Users if not already preselected.
- From the Users list, select all of the people who need to be assigned a new role.
- Select their role from the dropdown and add any relevant filter limiting.
- Then click Assign role to assign the role in bulk.
Add a filter for a user's role
For roles with access to sensitive data, you can further customize the role by adding a filter that allows that person to see sensitive data for particular departments or by a custom filter that you can define.
For example, a recruiter who focuses on sales roles may not need to access compensation for all open roles; they might only need access to the Sales department.
You can create filters to associate custom access rules to a person's role. For example, if you want a People Partner to have sensitive access to everyone in the New York office, but exclude executives and members of the Human Resources department, you could use the filter:
location:"new york" !team:executives !department:"human resources"
You can add filters to all roles except the Employee, Guest, and Recruiting editor roles.
If a user’s role is limited by a filter, the information they see for terminated employees will be limited.
For example, if an HRBP has the role of an org editor with a custom filter for particular departments or locations, that person would not be able to see sensitive information for a terminated employee regardless of department or location.
This is because terminated employees no longer belong to any groups. Role filters are seen as providing visibility to only certain groups or parameters. If someone with a role that uses a custom filter needs access to sensitive data for terminated employees, the workaround is to temporarily remove the filter.
To add a filter for a user's role:
- From the left sidebar, select Access.
- From the sub-menu, select Users if not already preselected.
- From the Users list, select the name of the user you want to edit.
- In the Edit user dialog, use the Role dropdown to select the role you wish to assign to your user.
- Scroll down within the dialog to view the filter checkboxes.
- Choose one of the filters or use both to refine the user's role further.
- Department limited -- Select this checkbox and type the names of a department or departments to which you want to limit this user's role.
- Custom-filter limited --Select this checkbox and create a custom filter that defines the rules for this user's role.
- Select Save.
Removing users
You can add and remove users from your ChartHop organization.

To remove users:
- From the left sidebar, select Access.
- From the sub-menu, select Users if not already preselected.
- From the Users list, select the checkbox for each user you wish to remove
- Tip: Filter to Status: Invited or Status: Joined
- Select Remove user from the options bar.
- Select Remove user from the Remove user dialog.
Editing user information
You can edit your user's information in your ChartHop organization.
To edit a user:
- From the left sidebar, select Access.
- From the sub-menu, select Users if not already preselected.
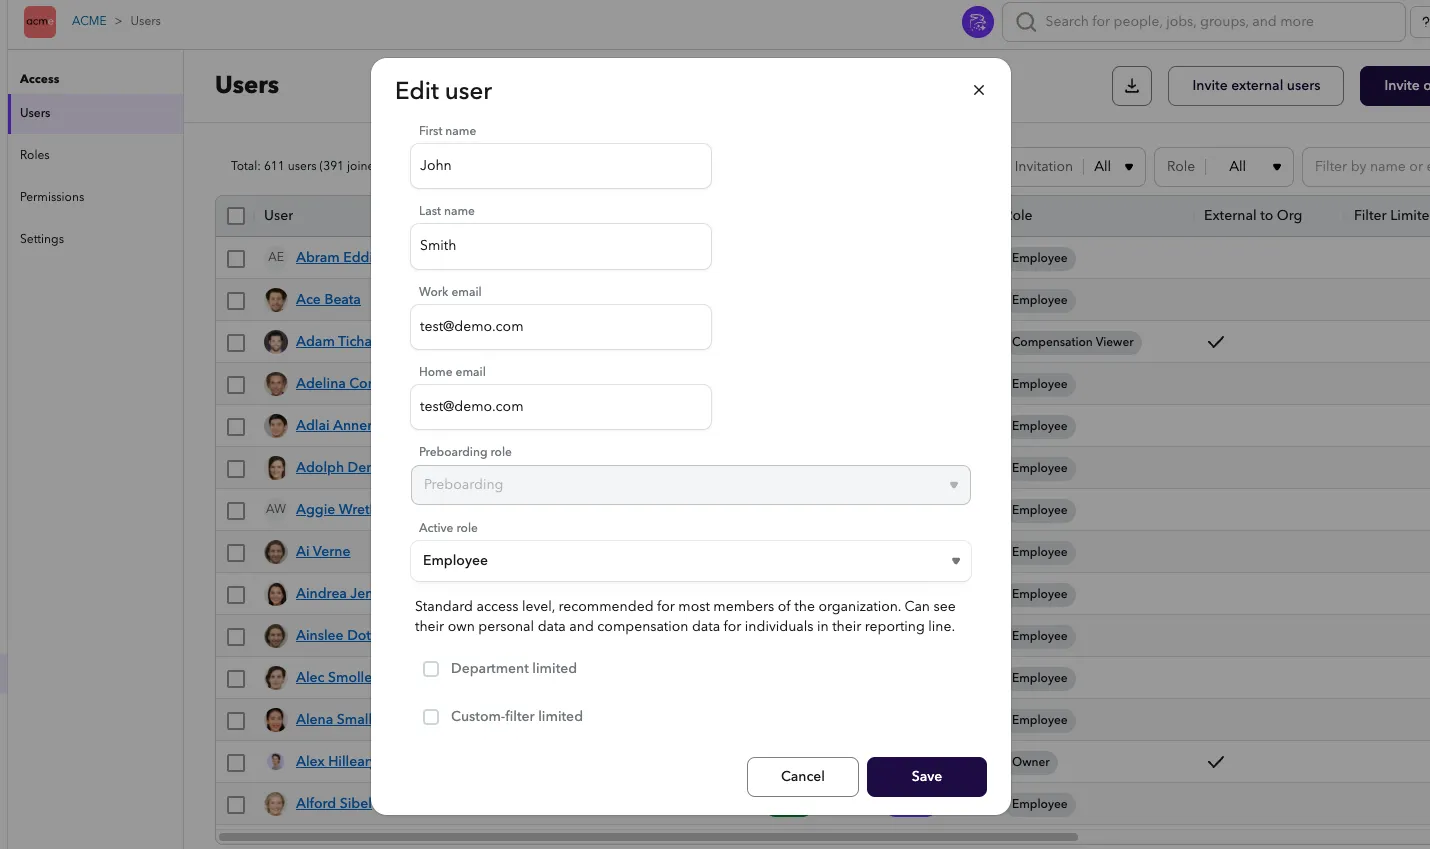
- From the Users list, select the name of the user you wish to edit.
- If you are unable to select the name of the user then you do not have permission to edit the user.
- In the Edit user dialog, make changes to your user.
- Select Edit user when you're done.
Note: Preboarding users will have additional options to edit the home email and the "Active role" that will be used when the user starts at the company.
Revoking user sessions
You can revoke user's sessions in your ChartHop organization. They will be required to reautheticate when the login again.
To revoke user sessions:
- From the left sidebar, select Access.
- From the sub-menu, select Users if not already preselected.
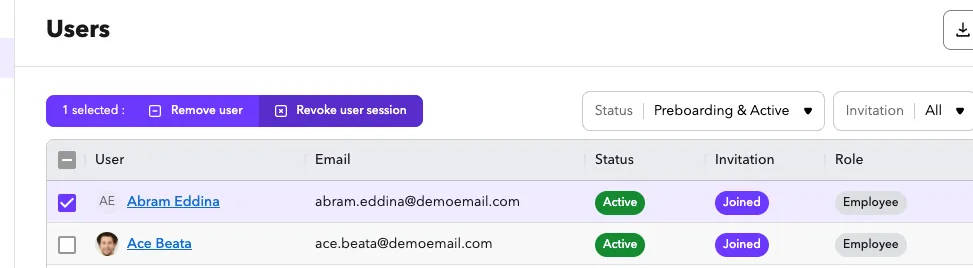
- From the Users list, select the checkbox for each user you wish to revoke the session.
- Tip: Filter to Status: Joined
- Select Revoke user session from the options bar.
- Select Revoke session from the Revoke user session dialog.
Export a list of users
To export a list of users:
- From the left sidebar, select Access.
- From the sub-menu, select Users if not already preselected.
- In the top right corner, select the Export CSV icon button
- Click Export in the Export CSV dialog.