Subscenarios
In Make, you can build an automation using a parent scenario and one or more subscenarios.
- A parent scenario is the main scenario that triggers one or more subscenarios via the Scenarios > Call a scenario module.
- A subscenario is a scenario triggered by a parent scenario or other sources, such as an AI agent, an MCP client, or an API call.
A parent scenario can include multiple Scenarios > Call a scenario modules to trigger different subscenarios. A subscenario can also act as a parent scenario and trigger other subscenarios through the Scenarios > Call a scenario module.
Benefits of subscenarios
Subscenarios help you to:
- Simplify complex workflows: Break down large scenarios into smaller, manageable components that are easier to build, maintain, and troubleshoot.
For example, instead of building a single scenario with dozens of routes to handle lead creation, checking companies, contacts, campaigns, and affiliates, you can split each task into its own subscenario. The parent scenario stays clean and readable, while each subscenario handles one thing well.
- Save time by reusing logic: Use the same subscenario across different parent scenarios instead of recreating modules.
For example, if multiple scenarios need to update your product inventory, new orders, returns, B2B deliveries, you can build one inventory subscenario and call it from all of them. Update the logic once, and all parent scenarios benefit automatically.
- Extend automation to AI agents and MCP servers: Use scenarios as callable tools in agent workflows.
For example, you can expose a subscenario as a tool that an AI agent calls when it needs to look up a customer record, send a notification, or trigger an action in an external app, without the agent needing to know how the underlying automation works.
- Transfer data more easily: Pass a clearly defined structure of inputs and outputs between scenarios.
For example, you can send a customer’s email as an input to a subscenario. It checks whether they’re already registered, then returns a status as an output that the parent uses to decide whether to send a welcome email. If you call a scenario using the Webhooks app, you don't have the in-built capability to define the inputs you want to pass from the parent scenario and the outputs you want to receive from the subscenario
- Reduce credit usage: Scenarios run via the Scenarios app don't consume credits.
For example, if you call a scenario using the Webhooks and Make apps, each operation will consume credits. With the Scenarios app, you can call scenarios, pass the inputs, and return outputs free of charge.
Limitations of subscenarios
Although subscenarios offer multiple benefits, they also have certain limitations. You can only call a scenario created in your team. If you want to call a scenario from another team or organization, you have to use one of these modules:
- Make > Run a scenario
- Webhooks > Custom webhook
Calling modes for subscenarios
Subscenarios can run in two modes that define how the parent scenario and the subscenario interact. They can follow:
- Synchronous execution
- Asynchronous execution
The mode depends on whether the parent scenario needs the subscenario´s results to continue the run.
Synchronous execution
In synchronous mode:
- The parent scenario calls the subscenario via the Scenarios > Call a scenario module, passes scenario inputs, and pauses execution until the subscenario completes.
- The subscenario starts running with the Scenarios > Start scenario module, processes the inputs, and returns outputs to the parent scenario via the Scenarios > Return outputs module.
- Once the parent scenario receives the outputs, it resumes execution.

Asynchronous execution
In asynchronous mode:
- The parent scenario calls the subscenario via Scenarios > Call a scenario module, and continues immediately without waiting for outputs.
- The subscenario starts running with Scenarios > Start scenario module and completes its operations independently.

A parent scenario can also call multiple subscenarios that run in different modes.
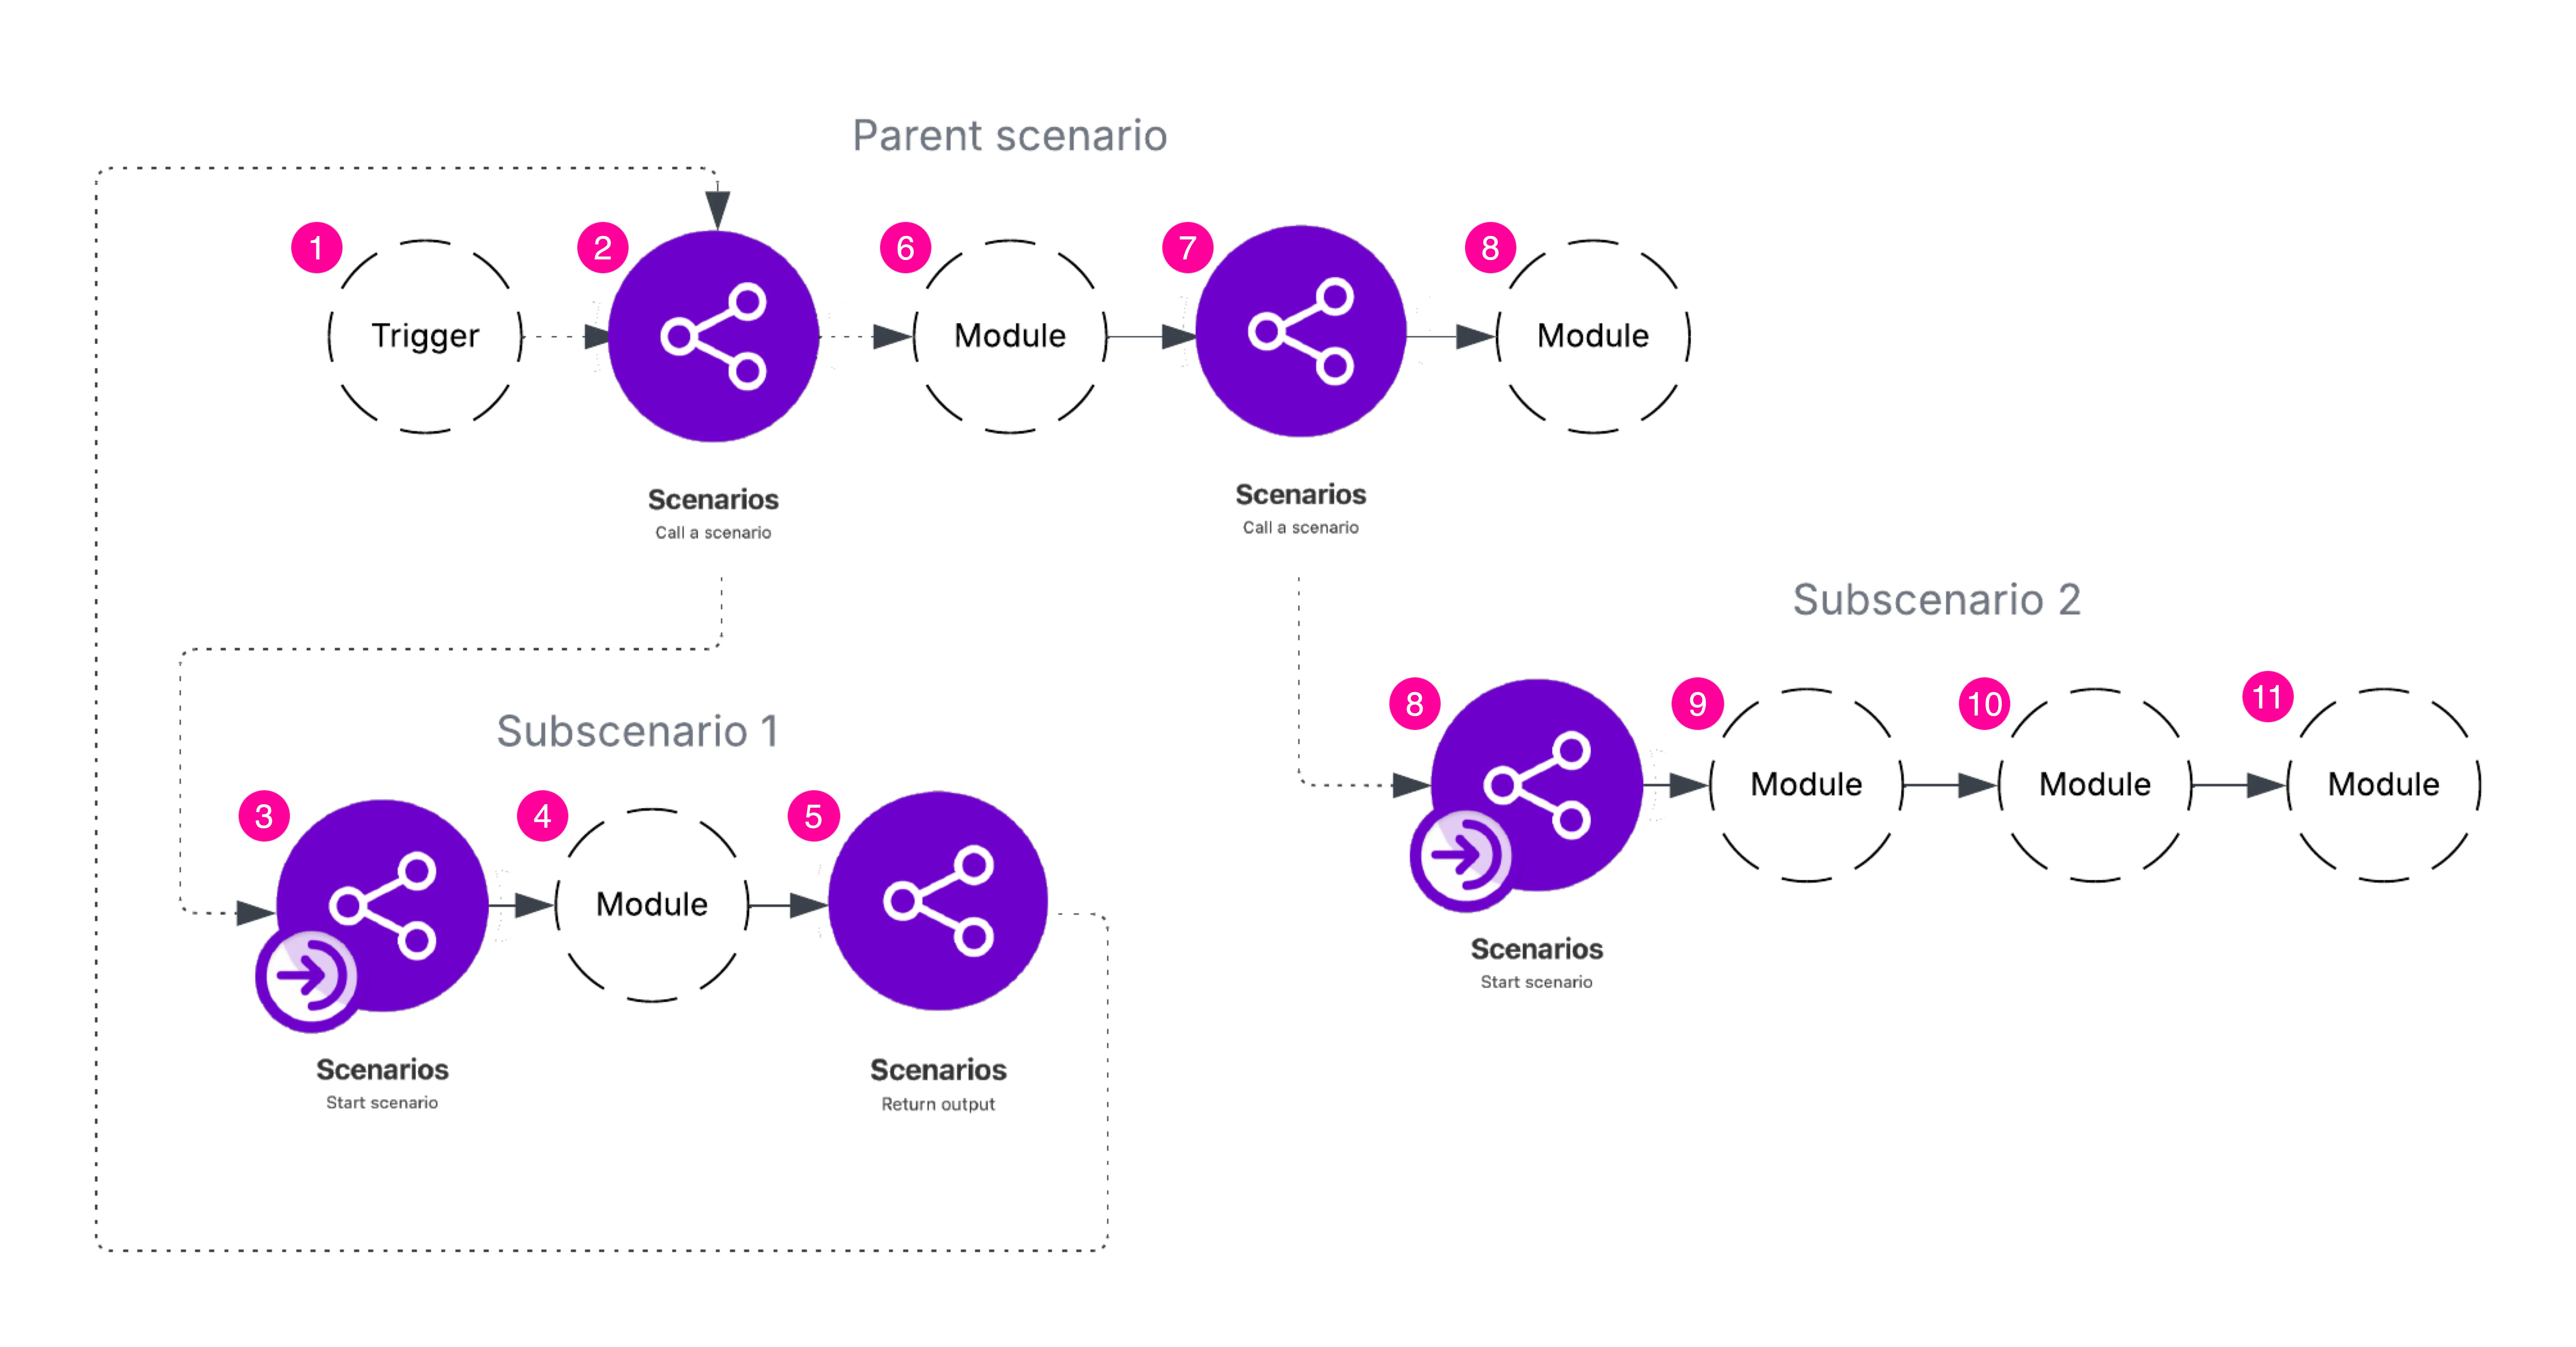
Create a parent scenario with subscenarios
To build an automation with subscenarios, you need to:
- Create a parent scenario
- Create one or more subscenarios that this parent scenario will call
- Link them with the Scenarios > Call a scenario/Scenarios > Start scenario modules
Let's look at this basic workflow as an example and walk through each step afterward.
A parent scenario:
- The parent scenario receives the data from the Jotform > Watch for Submissions.
A subscenario with synchronous execution:
- The parent scenario sends the data to the subscenario and waits for the output.
- The subscenario checks if the email from the event registration form already exists in the database using the Google Sheets > Search Rows module.
- A Router handles two possible outcomes:
- Email doesn't exist: The participant is added to the database via the Google Sheets > Add Rows module. The subscenario sends a confirmation and the data back to the parent scenario via Scenarios > Return output module.
- Email already exists: The subscenario sends a notification back to the parent scenario via the Scenarios > Return output module.
- After the parent scenario receives confirmation that the email has been added, it sends a welcome email to the participant via the Gmail > Send an email module.
A subscenario with asynchronous execution:
- The parent scenario sends the data to the subscenario and immediately proceeds to send a welcome email to the participant without waiting for the outputs.
- The subscenario stores the participant's data in the database and completes.
Create a parent scenario
To create a parent :
In , click +Create a new scenario.
In the Scenario Builder, click the big plus icon and add the Jotform > Watch for Submissions module.
In the Webhook field, click Add to create a webhook.
In the Create a webhook window:
- In the Webhook name field, enter the webhook's name.
- In the Connection field, select a connection or create a new one.
- In the Team field, select the Jotform team.
- In the Form field, select the form that collects event registrations.
- Click Save.

Click Save to save the module settings.
Click the plus icon next to the Jotform > Watch for Submissions module and add the Scenarios > Call a scenario module.
In the Scenario field, click +Create scenario.

You can also select an existing scenario from the list. In this case, make sure that the scenario you select as a subscenario is active and scheduled to run on demand.
Additionally:
- Use the Scenarios > Start a scenario module to start a subscenario
- Define scenario inputs
- Define scenario outputs if the parent scenario expects them
- Use Scenarios > Return output module if the parent scenario expects outputs
After this, you'll be redirected to the Scenario Builder. There, you can create and configure your subscenario based on whether you want synchronous or asynchronous execution.
Create a subscenario with synchronous execution
After clicking Create a scenario in the Scenarios > Call a scenario module, you can configure your subscenario. To do that:
In the Create a scenario window:
- In the Name field, enter the subscenario name.
- Optionally, in the Description name field, add a description.
- Define the input and output structure.
In our example, the parent scenario receives the Name and the Email from the Jotform > Watch for Submissions module and passes this data to the subscenario. Therefore, we create two scenario inputs: name and email.
For outputs, we want to return the participant's registration status together with the name and email, so we create three outputs: status, name, and email.
- Click Create scenario.

You can see scenario inputs and outputs in the subscenario.

It is important to define the structure of scenario inputs and outputs accurately to ensure data passes without errors.
You will see a scenario diagram with two automatically added modules: Scenarios > Start scenario and Scenarios > Return outputs. To add modules to your subscenario, click the big + icon between the modules.

Add the Google Sheets > Search Rows module to check whether the email already exists in your database. In the module settings:
- Select the spreadsheet and sheet where registrations are stored.
- In the Filter field:
- Select the Google Sheet's column that contains emails.
- Set the Text operators: Equal to.
- Map the email from Scenarios > Start scenario module.
- Click Save.

Add a Router that will handle two possible routes.
The first route will run if the email from the registration form doesn't exist in the database. To configure the filter, right-click the dots between the modules and select Set up a filter.
Set the Condition as follows:
- Map Total number of bundles from the Google Sheets > Search Rows module.
- Select Numeric operators: Equal to
- Enter 0.

Add the Google Sheets > Add a Row module to store the email and the name from the registration form. In the module settings:
- Select the spreadsheet and sheet where registrations are stored.
- Map name and email values from the Scenarios > Start scenario module.
- Click Save.

Click the Scenarios > Return output module after the Google Sheets > Add a Row module. You will see the output fields you defined when creating a subscenario:
- In the Status field, enter a message indicating the participant has been added: e.g., Participant added.
- In the Name and Email fields, map the name and email passed from the parent scenario so that you can identify the participant.

Return to the Router and add a second route.
This route will run if the email from the registration form already exists in the database. To configure the filter, right-click the dots and select Set up a filter.
Set the Condition as follows:
- Map Total number of bundles from the Google Sheets > Search Rows module.
- Select Numeric operators: Greater than
- Enter 0.

Add another Scenarios > Return output module to this route. You will see the output fields you defined when creating a subscenario:
- In the Status field, add a message indicating the participant is already registered: e.g., Participant already exists.
- In the Name and Email fields, map the name and email passed from the parent scenario.

Your subscenario should now look like this:

All subscenarios should be active and scheduled on demand.
If you create a subscenario from the Scenarios > Call a scenario module, it's automatically scheduled on demand. In this case, you only need to enable the toggle to activate the subscenario and save it.

Return to the parent scenario to complete the configuration.
Open the Scenarios > Call a scenario module and verify that:
- The correct subscenario is selected
- The subscenario is active (has a green Active label)
In the Scenario inputs field, map the data you pass from the parent scenario to the subscenario. In this example, it will be Name and Email from the Jotform > Watch for Submissions module.
Set Wait for the scenario to finish to Yes. In a synchronous execution, it indicates that a parent scenario will wait for a subscenario's outputs before continuing execution.
Once verified, click Save.

Add the Gmail > Send an email module to send a welcome email to the registered participant. Here, you can map email returned from the Scenarios > Call a scenario module to the Recipient email address field.

The Scenarios > Call a scenario module will return outputs from your subscenario. Since we only need to send the email to the newly registered participants, set up a corresponding filter.
Right-click the dots between the Gmail > Send an email and Scenarios > Call a scenario modules, and click Set up a filter.
Set the Condition as follows:
- Map status from the Scenarios > Call a scenario module.
- Select Text operators: Equal to
- Enter Participant added (the status defined in step 8).
- Click Save.

Your parent scenario should look like this:

Save it and submit a form in Jotform to test the workflow.
Create a subscenario with asynchronous execution
After clicking Create a scenario in the Scenarios > Call a scenario module, you can create your subscenario. To do that:
In the Create a scenario window:
- In the Name field, enter the subscenario name.
- Optionally, in the Description name field, add a description.
- Define the input structure.
In our example, the parent scenario receives the Name and the Email from the Jotform > Watch for Submissions module and passes this data to the subscenario. Therefore, we create two inputs: name and email.
Since this is asynchronous execution, the parent scenario doesn't expect any outputs. Therefore, you don't need to define any output fields.
- Click Create scenario.
You will see a scenario diagram with the Scenarios > Start scenario and the Scenarios > Return outputs modules.
To add modules to your subscenario, click the big + icon between the modules
Add the Google Sheets > Add a Row module to store the participant's information. In the module settings:
- Select the spreadsheet and sheet where registrations are stored.
- Map name and email values from the Scenarios > Start scenario module.
- Click Save.
If you create a subscenario from the Scenarios > Call a scenario module, the Scenarios > Return output module is added automatically.
Since in asynchronous execution, your subscenario will not return any output, you can right-click this module and delete it.
Your subscenario should now look like this:

All subscenarios should be active and scheduled on demand.
If you create a subscenario from the Scenarios > Call a scenario module, it's automatically scheduled on demand. In this case, you only need to enable the toggle to activate the subscenario and save it.
Return to the parent scenario to complete the configuration.
Open the Scenarios > Call a scenario module and verify whether:
- The correct subscenario is selected
- The subscenario is active (has a green Active label)
In the Scenario inputs field, map the data you pass from the parent scenario to the subscenario. In this example, it will be Name and Email from the Jotform > Watch for Submissions module.
Set Wait for the scenario to finish to No. In asynchronous execution, it indicates that a parent scenario will not wait for a subscenario's outputs and will continue execution after calling it.
Once verified, click Save.
If the subscenario has a grey Inactive label, click Preview. This will open a subscenario in a new window, where you can activate and save it.

Add the Gmail > Send an email module to send a welcome email to the registered participants. Here, you can map email returned from the Scenarios > Call a scenario module to the Recipient email address field.
Finally, save the parent scenario and submit a form in Jotform to test the workflow.
When to use subscenarios
Reduce the complexity and simplify the maintenance of scenarios
Subscenarios are useful when you're building a complex workflow with multiple conditions and branching logic. They help reduce overall complexity and make scenarios easier to read, debug, and maintain.
Let's suppose you are creating a "B2B Leads Creation" scenario that receives new contact information, which includes:
- The contact's identity
- The company they work for
- Optionally, the affiliate who introduced them
- Optionally, the campaign or event they are interested in
Creating a contact may seem simple, but the process can quickly become complex, as you need to:
- Check whether the company already exists in the CRM (and create it, if it doesn't)
- Check whether the contact already exists (and create or update it, if necessary)
- Optionally, add the contact to campaigns or events
- Optionally, link the contact to an affiliate partner
If you process such a complex workflow in a single scenario, you may end up with multiple routes and nested filters leading to more routes. As the workflow grows, it becomes harder to read, more difficult to debug, and increasingly complex to maintain.
A better approach is to divide the workflow into dedicated subscenarios for each task:
- Create or update a company
- Create or update a contact
- Add a contact to a campaign or event
- Attach a contact to an affiliate
With this structure, the parent scenario stays simple. It can have a few routes, evaluate high-level conditions, and call the appropriate subscenario when needed. The subscenarios will focus on a single task each and have their own routes and conditions. Even if a subscenario becomes complex internally, it remains easier to maintain and troubleshoot.
Reuse instead of duplicating
Subscenarios are also useful for avoiding duplicated logic across multiple workflows. Let's suppose you're managing product inventory and need to create or update products in several different business cases:
- When a new order is placed in your online store, you decrease the stock
- When a B2B partner places a direct order, you also decrease the stock
- When new products are delivered, you update the product in the inventory
- When a customer returns a product, you increase its stock
You can build separate scenarios for each of these cases. For example, when a new order is placed in Shopify, the scenario would:
- Check whether the product still exists in the inventory in your ERP
- Verify that stock is available
- Return an error if the stock is 0
- Decrease the stock by the ordered quantity
Similarly, when adding a new product to the inventory via a form, the scenario would:
- Verify whether the SKU already exists
- Create the product if it doesn't exist
- Update the stock level accordingly
If you look closely, each use case follows the same pattern:
- Verify whether the product exists
- Check stock levels
- Increase or decrease stock
- Update product information
- Handle errors (e.g., when stock equals 0)
By having a workflow for each case, you're duplicating actions across multiple scenarios and spending more time on updating each of them. Additionally, if you want to add another step to the workflow (e.g., add a new POS with access to update inventory), you have to duplicate the stock inventory logic again.
A better approach is to create a dedicated subscenario that will handle inventory and:
- Create products
- Update products
- Verify stock levels
- Increase or decrease stock
- Manage stock-related errors
All parent scenarios can simply call this subscenario whenever inventory needs to be checked or modified. You will no longer need to duplicate the stock management operations as they are centralized in one subscenario that reuses the same logic. You can also link any new parent scenario at any time, and if you change ERP or handle more data, you just need to change one single scenario.
Manage scenario chains
chaining simplifies the management of sequences, where one triggers another. This approach eliminates the need for naming conventions or organizing sequences in folders. Instead, you can easily monitor and manage the within a chain from multiple places in Make:
Run a scenario module: When you select a in the Scenarios > Run a scenario module, you can see at the top of the module settings information about the triggered by the module:
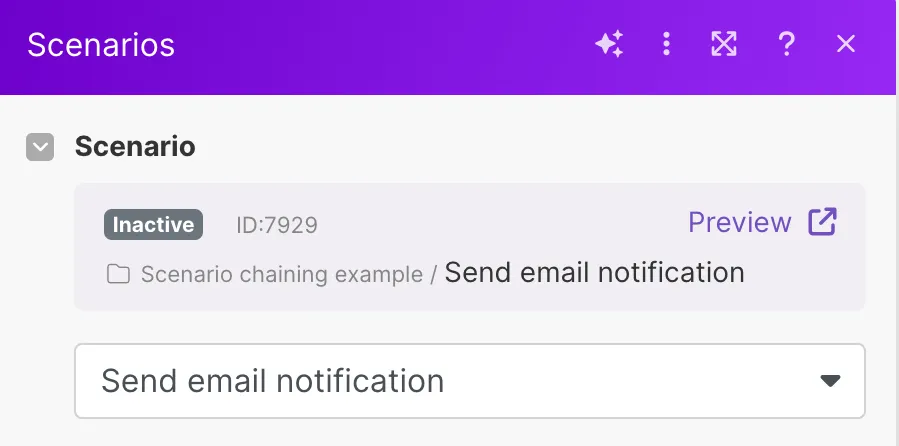
You can see:
- whether the is enabled (Active) or disabled (Inactive)
- ID
- the folder name
- the Preview link. Clicking the preview link opens a new browser tab with the linked scenario open in the Scenario Builder
Relation tree tab: Scenarios that are part of a scenario chain have the Relation tree tab:
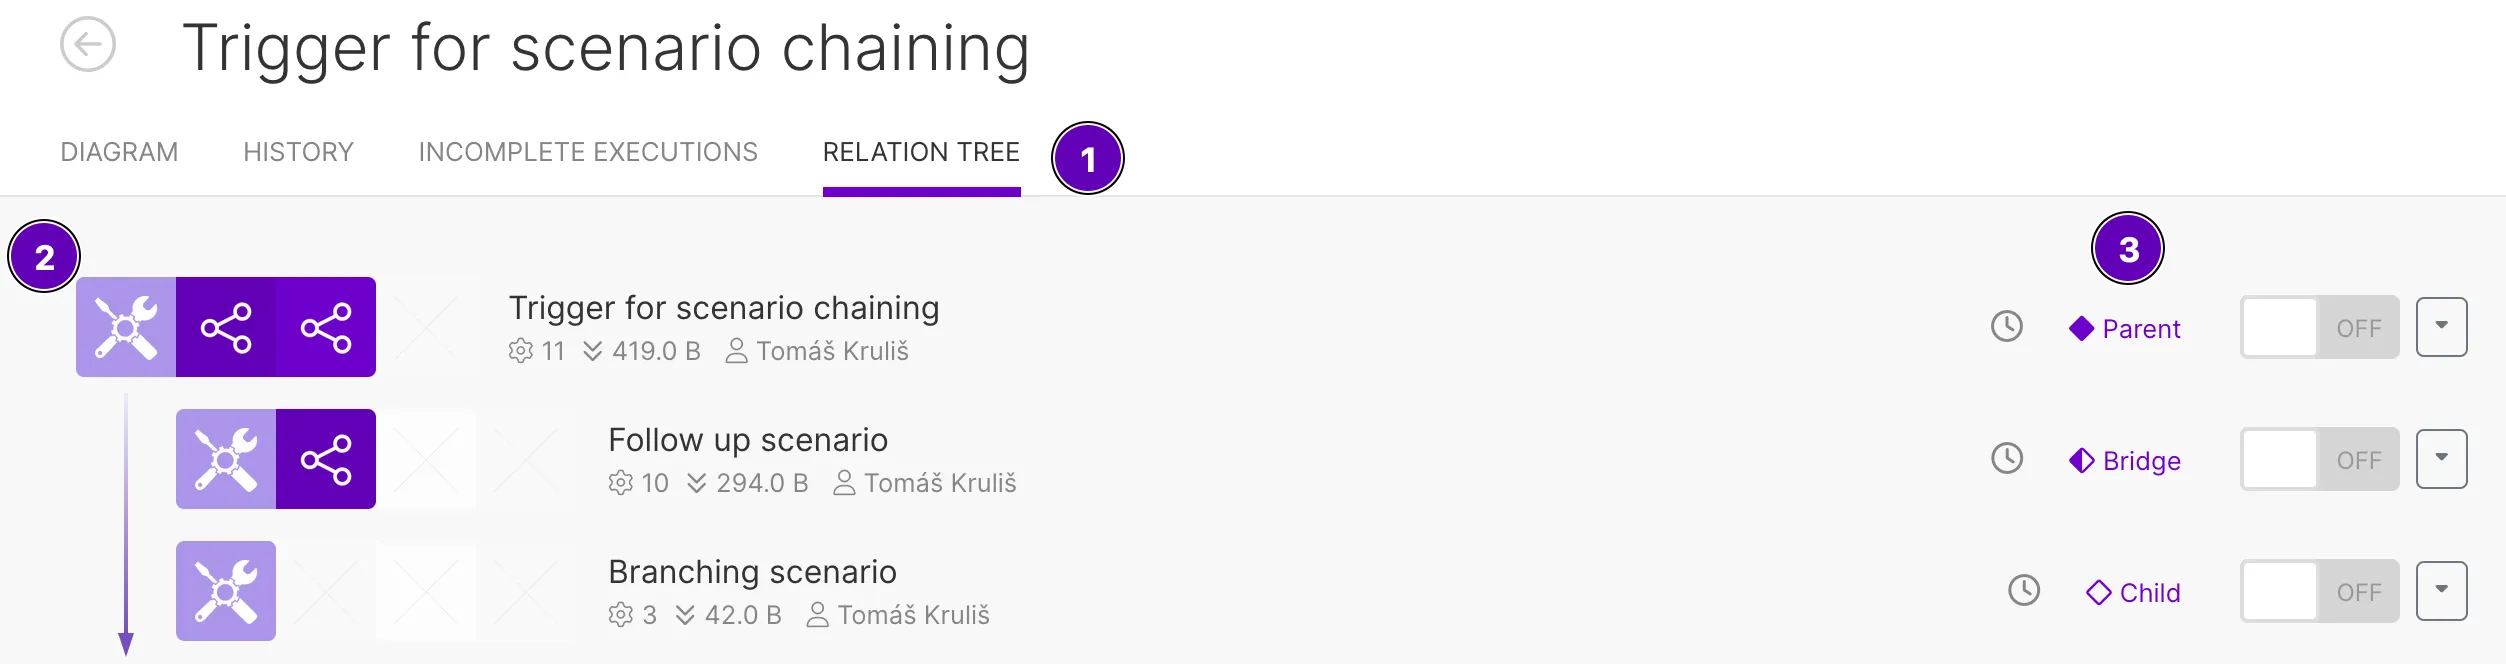
- The Relation tree tab shows directly connected to the currently open in the chain.
- The open is outdented in the relation tree.
- A column in the relation tree shows the relation of the in the chain.
The scenario list also shows the chain relations:
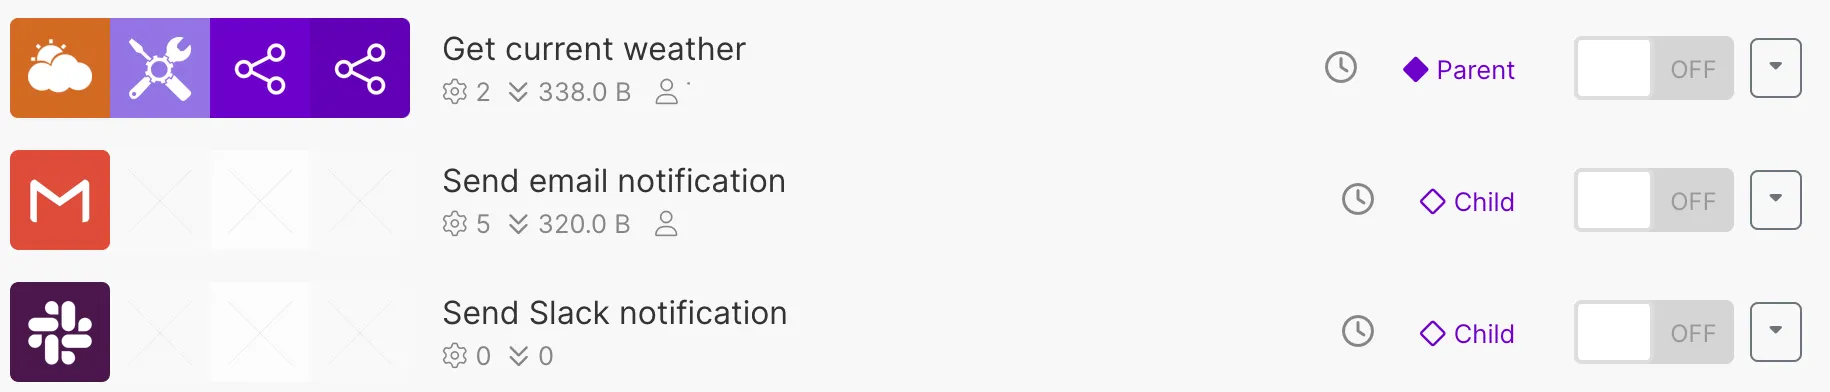
Bundles output by the Run a scenario module contain a link to the triggered run.
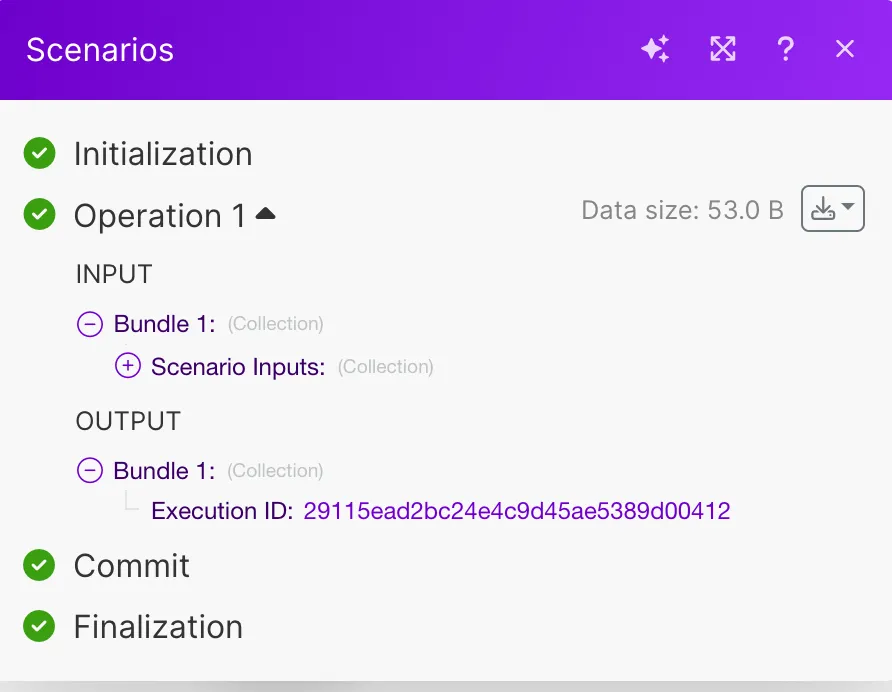
Scenario history contains a link to the scenario that triggered the scenario run.
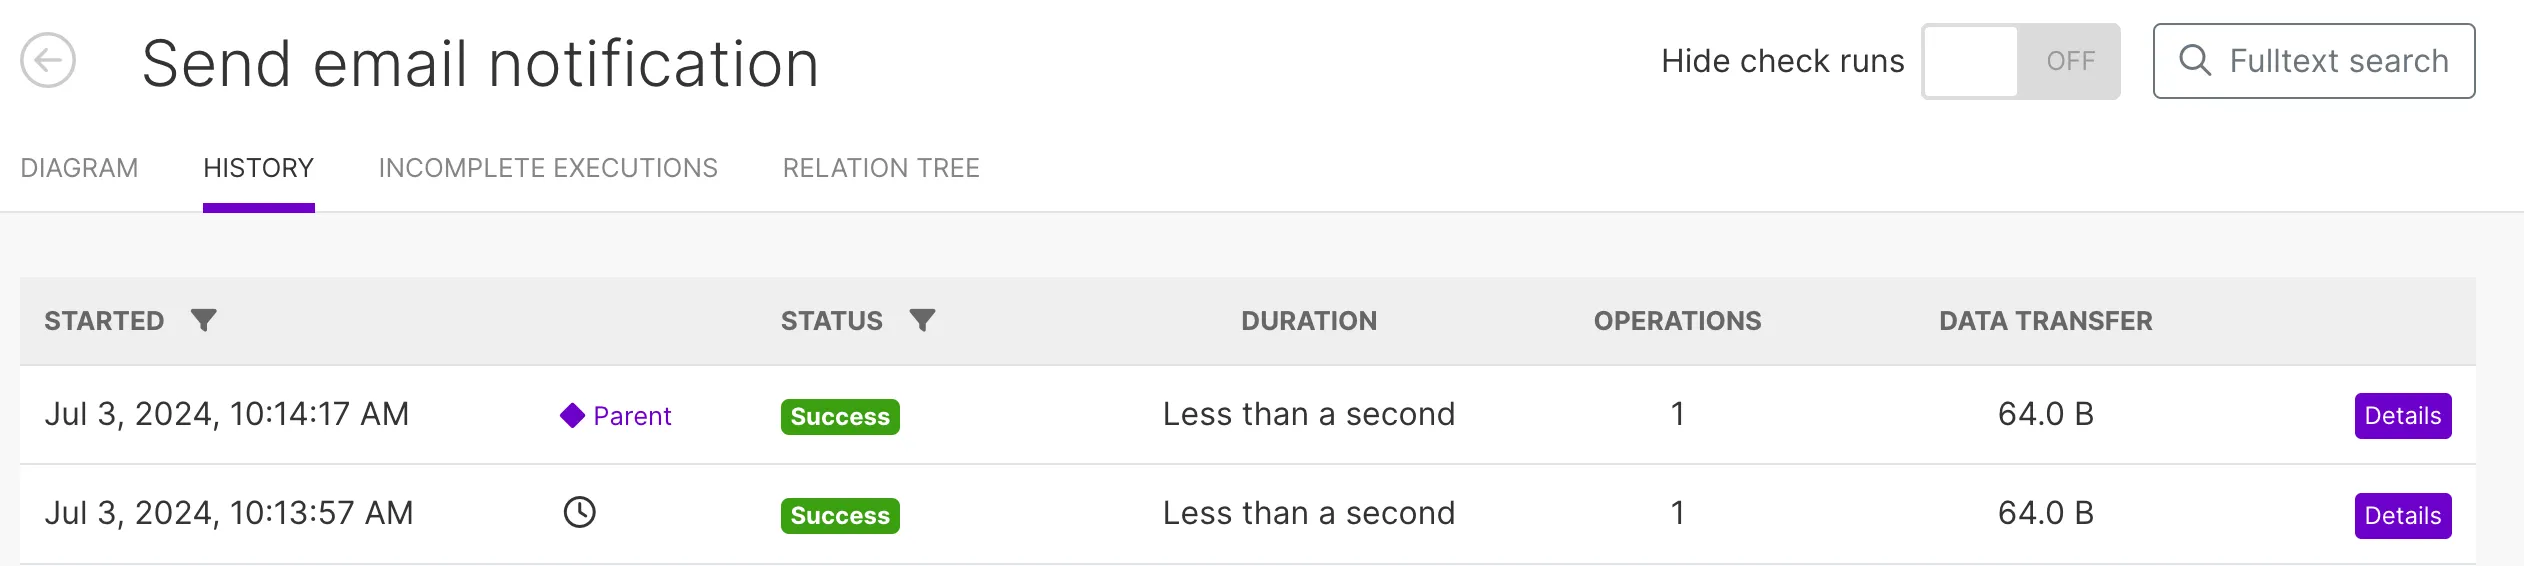
There is no link if the in the chain runs because of its own scheduling instead of being triggered by a parent or a bridge .
Add scenarios to a scenario chain
To add a to an existing chain:
Create the you want to add to the chain.
Go to the from which you want to trigger the new .
In the parent , add the Scenarios > Run a scenario module.
In the Scenario field, select the you want to trigger (the created in step 1).
You connected the to a chain. Check the Relation tree tab of the added to see the connected to the parent .
Make sure to review the scheduling and enable the added .
Remove scenarios from a scenario chain
To remove a from a chain:
Go to the parent which triggers the you want to remove.
In the parent , remove the Scenarios > Run a scenario module.
You removed the from a chain. The removed doesn't have a Relation tree tab anymore and Make doesn't highlight the as a part of a chain.