Format a microSD Card
8 min
These steps will erase all the contents on the selected microSD card. Back up any data you want to keep before proceeding with the steps below.
There are several ways to format or erase your microSD card depending on your system configuration and whether or not you have physical access to the microSD card.
Windows
Prerequisites
- Physical access to the microSD card.
- A Windows PC.
- Connect your microSD card to your computer using an adapter if necessary.
- Open File Explorer (aka Windows Explorer) by holding the Windows key and tapping E on the keyboard, or running Explorer from the Start Menu. The microSD card should appear as a drive letter in File Explorer.
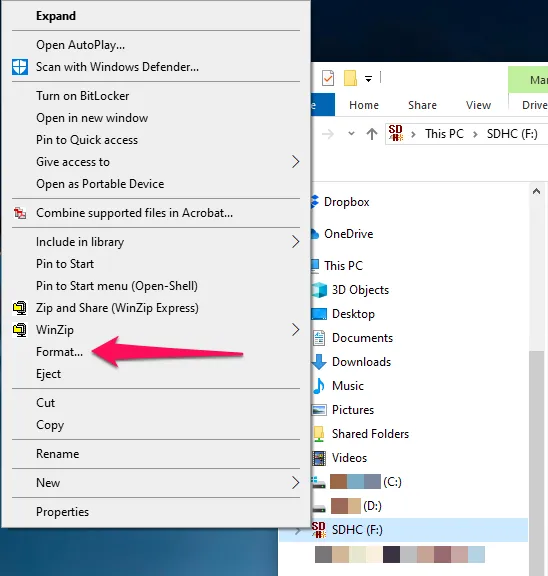
- Right-click the drive letter and select Format (see Image 1).
- Choose exFAT - if using a BrightSignOS version lower than 6.2.94 or using a Series 2 or older player, choose FAT32 (Default) or FAT.
- Select Start and then format.
- Once the process is done, eject the microSD card. It is now safe to remove the microSD card from the computer.
macOS
Prerequisites
- Physical access to the microSD card.
- A Mac.
- Connect your microSD card to your computer using an adapter.
- In macOS X Finder, go to Utilities (Go > Utilities or ⇧⌘U) and open Disk Utility.
- Choose the microSD card entry from the left.
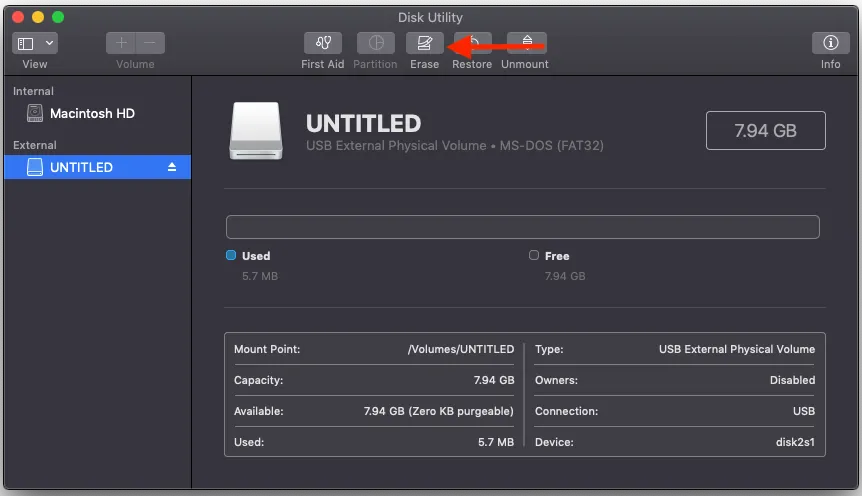
- Select Erase from the top of the window (see Image 2).
- Choose ExFAT - if using a BrightSignOS version lower than 6.2.94 or using a Series 2 or older player, choose MS-DOS (FAT).
- Click the Erase button.
- Once the process has finished, click the eject icon next to the microSD card on the left to unmount. It is now safe to remove the microSD card from the computer.
Player on BSN.Cloud
Prerequisites
- Player has been provisioned with BSN.Cloud.
- Ability to access the player over the internet.
In the player's Remote Diagnostic Web Server (RDWS), the player can reformat the card:
- In BrightSign Author, go the Device List in the Network section.
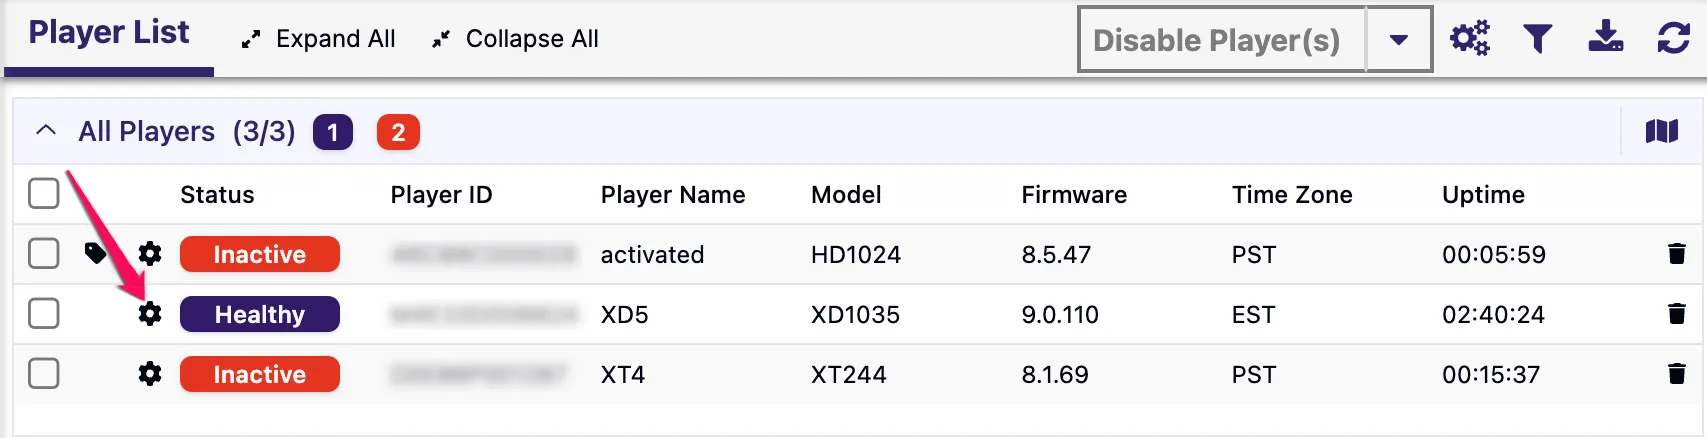
- Select the gear next to the player to open the RDWS (see Image 3).
- Select the Diagnostics tab.
- Select Disable in the Disable Autorun section and confirm you want to disable the autorun.
- After the player reboots, go to the Diagnostics tab in the RDWS and select Format Storage in the Storage Formatting section.
- Select SD as the Storage and exFAT as the File system. If using BrightSignOS version lower than 6.2.94 or a Series 2 or older player, choose FAT32 instead of exFAT.
- Select Format. If you need to make changes to the microSD card contents, like adding autorun.zip to apply configuration files or a third-party CMS application, do so now.
- To get the player to notice the change to the card, reboot the player in the Control tab of the RDWS or power cycle it.
Player Not on BSN.Cloud
Prerequisites
- Ability to access the player over the local network.
If you can connect to the player's Diagnostic Web Server (DWS), the player can reformat the microSD card:
- Open a web browser on the same local network as the player and connect to http://playerIPaddress/index.html.
- If you cannot connect, check the IP address, firewall, and network security.
- If you have not connected to the player's DWS successfully in the past, the player may have been configured with its Diagnostic Web Server disabled.
- Replace playerIPaddress with the player's LAN IP address.
- If you don't know your player's LAN IP address, you can get it from the player's Properties in the BrightAuthor Manage tab, or from the information screen displayed when the player is powered up without storage inserted.
- If you were previously using a third-party CMS, the Diagnostic Web Server may have been relocated to a different port number, like 8080, in which case the URL to connect to would look like http://playerIPaddress:8080/index.html
- If prompted for a Username, use admin.
- If prompted for a Password and you have not previously set a password for the DWS, try the player's serial number in UPPERCASE. If the serial number does not work, try blank (don't enter a password).
- In the Diagnostics tab, go to the Disable Autorun section and click Reboot.
- Reconnect to the player's DWS after the player reboots, then select the Diagnostics tab.
- Select Format Storage in the Storage Formatting section, then select SD as the Storage and exFAT as the File system - if using a BrightSignOS version lower than 6.2.94 or using a Series 2 or older player, choose FAT32 instead of exFAT. Select Format.
- If you need to make changes to the microSD card's contents, like adding autorun.zip to apply configuration files or a third-party CMS application, do so now.
- Reboot the player in the Control section or power cycle it to apply the changes.